Semiconductor testing services

Measurlabs offers a comprehensive selection of semiconductor testing services for surface contamination analysis, compositional depth profiling, and structural characterization. In addition to test results, you will receive support from highly qualified and responsive method experts.
Semiconductor testing services
Kone logoNeste logoFermion logoPlanmeca logoSulapac logoOkmetic logo
  • Fast turnaround times
  • Personal service from method experts
  • Competitive prices
  • Result accuracy guarantee
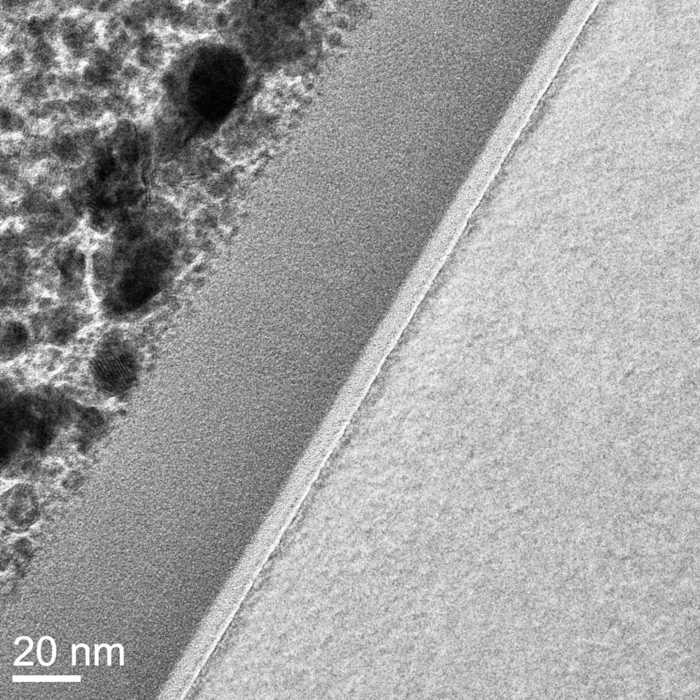
Cross-sectional TEM image of a thin film

Imaging services

We offer several techniques for high-resolution imaging of semiconductor devices and components, including the following:

Several additional detectors are available for electron microscopy, including EDX for simultaneous elemental analysis and EBSD for visualizing crystal structures. Cross-sectional analysis is possible with FIB and BIB sample preparation.

SEM-EDX imaging

Imaging of the sample using a scanning electron microscope (SEM) with energy-dispersive X-ray spectroscopy (EDX or EDS). Typically, several images are taken with varying magnifications to get a good overview of the sample. An EDX mapping, line scan, or point measurement is collected to measure the sample composition (elemental at.% or wt.%). Non-conductive samples can be prepared with a metallic coating. For cross-section measurement, additional preparation might be needed: FIB, BIB, or freeze fracturing.
157–609 €
Read more

AFM surface imaging

During this analysis, the surface of a smooth and hard sample is imaged with an atomic force microscope (AFM). Topological images are typically provided from three locations around the sample. The measurement area is 5 x 5 micrometers, if not otherwise agreed. Measurements are typically done using the following instrument: Bruker Dimension Icon.
220–349 €
Read more

TEM imaging

Imaging of the sample with a transmission electron microscope (TEM). Typically, several images with varying magnifications are taken to get a good overview of the sample. TEM allows nm-resolution images. Solid samples often require FIB preparation before analysis. HR-TEM and cryo-TEM can also be provided. Contact us for more details.
532–1,410 €
Read more

TEM-EDX imaging

Imaging of the sample with transmission electron microscopy (TEM) and determination of the elemental composition of the sample using electron dispersive X-ray spectroscopy (EDX or EDS). Several images with varying magnifications are taken to get a good overview of the sample. An EDX mapping, line scan, or point measurement is collected to measure the sample composition (elemental at.% or wt.%). For solid samples, the analysis often requires FIB preparation, which is priced separately. HR-TEM can also be provided. Contact us for more details about the analysis options.
607–1,477 €
Read more

SEM imaging

Imaging of the sample using scanning electron microscopy (SEM). Typically, several images are taken with varying magnifications to get a good overview of the sample. Non-conductive samples can be prepared with a metallic coating to allow imaging. For cross-section measurement, additional preparation might be needed: FIB, BIB, or freeze fracturing. Cryo preparation is available for biological materials and other sensitive sample types. If compositional analysis is also needed, please see the SEM-EDX measurement. We also offer high-temperature SEM analyses at temperatures up to 1400 °C. Do not hesitate to ask for a quote.
107–609 €
Read more

Focused ion beam (FIB) preparation

The focused ion beam (FIB) technique is used to prepare samples for electron microscopy. It allows very precise cutting of samples to observe them by TEM or SEM imaging. We are happy to provide a quote for FIB preparation on its own, as well as FIB-TEM or FIB-SEM analysis.
589–1,228 €
Read more

Scanning acoustic microscopy (C-SAM)

SAM is a non-destructive analysis technique used in failure analysis to obtain information on die-attach integrity, delamination, voids, cracks, and the effectiveness of bonding processes (including solder efficiency). Additionally, SAM can assess the quality of sealing, coating, flip-chip underfills, wafer-to-wafer bonding, and solder bump integrity. In addition to conventional C-SAM, we offer the possibility of analysis with Gigahertz SAM (GHz-SAM), which offers increased resolution. Maximum scan area: 300 mm x 300 mm – 350 mm x 350 mm for conventional SAM, 100 µm – 1500 µm for GHz-SAM., Transducer frequencies: 5 MHz - 1 GHz (different devices) with theoretical resolution ranging from 100 µm to ~1 µm.. Please note that the maximum penetration depth depends on the acoustic properties of your specific material and the acoustic impedance differences between material layers. Contact our experts through the form below to request a quote for your C-SAM analysis project.
186–929 €
Read more

X-ray computed tomography (micro and nano CT scan)

Nondestructive 3D analysis of internal structures by X-ray computed tomography. The method visualizes voids, cracks, density, and phase differences within solid structures. The analysis is suitable for powdered materials, such as pharmaceutical and cosmetic ingredients, as well as bulk solids and parts, such as machine parts and wafers. The voxel size can go down to 60 nm. Please contact us for more information about the analysis options for different materials and material dimensions. Some devices available for the analysis are as follows: Bruker SkyScan 1272 CMOS, Bruker SkyScan 2214 CMOS, Zeiss Xradia 515 Versa.
699–1,987 €
Read more

Prices excluding VAT.

Elemental composition analysis of semiconductors

Elemental composition analysis

Measurlabs offers several options for determining the elemental composition of thin films and wafers, both at the surface and as a function of depth. Some of the available analysis techniques include the following: 

  • Tof-ERDA for detecting all elements and different isotopes of hydrogen

  • SIMS for detecting trace amounts (ppm to ppb level) of impurities on the surface and at different depths

  • GD-OES for fast quantitative depth profiling without the need for a vacuum chamber – capable of detecting light elements

  • VPD-ICP-MS for determining trace metal contamination on the sample surface

ToF-ERDA measurement

Time-of-Flight Elastic Recoil Detection Analysis (ToF-ERDA) measurement for determining the elemental concentrations of thin films. ToF-ERDA is capable of identifying all elements, including various hydrogen isotopes. It provides elemental depth profiles by determining the concentration of each element at different depths within a sample. Typically, the method achieves detection limits ranging from 0.1 to 0.5 atomic percent and depth resolution between 5 and 20 nm. It is suitable for analyzing films with thicknesses between 20 and 500 nm. For accurate measurements, the sample surface should be smooth, with a roughness of less than 10 nm. The method is inherently quantitative when analyzing thin films on typical substrates, such as silicon (Si), gallium nitride (GaN), silicon carbide (SiC), gallium arsenide (GaAs), or indium phosphide (InP). So, reference samples are not needed to obtain quantitative results. The technique is particularly useful when analyzing light elements due to its good detection limits. In addition to typical ToF-ERDA measurements, we also offer LI-ERDA (also referred to as Foil ERDA) for more precise determination of hydrogen isotopes. The detection limits with LI-ERDA are typically around 0.01 atomic percent, and depth resolutions of ~1nm can be achieved. LI-ERDA only allows detection of hydrogen isotopes.
499–569 €
Read more

SIMS measurement

Secondary ion mass spectrometry (SIMS) is a highly sensitive elemental depth profiling method that can be used for a wide variety of solids to determine the presence of impurities or concentration of dopants. All elements from hydrogen to uranium can be detected with concentrations in the parts-per-billion (ppb) range. By using standards, SIMS allows for both qualitative and quantitative analysis. Depth profiling can be done from 10 nm down to a few µm thickness and needs to be done in electronegative or electropositive modes, depending on the analyzed elements. Do not hesitate to contact our expert for a quote tailored to your analysis project.
496–2,499 €
Read more

GD-OES measurement

Glow discharge-optical emission spectroscopy (GD-OES) is a quantitative technique used to profile the elemental composition of a sample in depth. The technique is mainly used for quick depth profiling of thick materials, providing their elemental composition as a depth profile. It is commonly used to analyze inorganic materials and coatings, such as metal, glass, and ceramic coatings or multilayer stacks.
465–721 €
Read more

VPD ICP-MS

VPD ICP-MS allows the determination of trace metal contamination on the surface of wafers. The full surface of the wafer is scanned during the analysis, unless edge exclusion (2 mm, 5 mm, etc.) is requested. VPD ICP-MS is performed using acid to dissolve the top surface of the wafer before the determination of elemental concentrations with ICP-MS. Please note that lighter elements, such as H, C, N, O, and F, cannot be analyzed. We offer different analysis packages for a wide range of elements: 58 element analysis: Al, As, B, Ba, Be, Bi, Ca, Cd, Ce, Co, Cr, Cs, Cu, Dy, Er, Eu, Fe, Ga, Gd, Ge, Hf, Hg, Ho, In, K, La, Li, Lu, Mg, Mn, Mo, Na, Nb, Nd, Ni, Pb, Pr, Rb, Sb, Sc, Se, Sm, Sn, Sr, Ta, Tb, Te, Th, Ti, Tl, Tm, U, V, W, Y, Yb, Zn, Zr, 41 element analysis: Al, As, B, Ba, Be, Bi, Ca, Cd, Co, Cr, Cs, Cu, Ga, Ge, Fe, Hf, Ir, K, Li, Mg, Mn, Mo, Na, Nb, Ni, Pb, Re, Sb, Sn, Sr, Ta, Te, Th, Ti, Tl, U, W, V, Y, Zn, Zr, 30 element analysis: Al, As, B, Ba, Be, Bi, Ca, Cd, Co, Cr, Cu, Ga, Ge, Fe, K, Li, Mg, Mn, Mo, Na, Ni, Pb, Sb, Sn, Sr, Ti, W, V, Zn, Zr, Custom 30-element package: You choose any 30 elements from our full 58-element list., Additional noble metals: Add the analysis of noble metals to any package from the options given below: Ag, Au, Pd, Pt, Rh, Ru, Ag, Au, Pt, Pd.. Additional elements are available upon request, Detection limits are in the ppm–ppb range (106–1010at/cm2). This measurement is primarily intended for 100, 150, 200, and 300 mm bare-silicon wafers, but we also offer ICP-MS analyses for other wafer sizes and thin films up to a few µm thickness. The most typically used instruments include the following: Perkin-Elmer NexION 350S ICP-MS, Perkin-Elmer Sciex ELAN 6100 DRC II ICP-MS, Thermo Fisher iCAP TQe ICP-MS, Finnigan element2 ICP-MS. Express turnaround (1–3 business days) can be arranged upon request for an additional charge. Contact us for more information and to request a quote.
378–870 €
Read more

Prices excluding VAT.

Determination of physical characteristics

We provide a range of methods for determining the thickness, roughness, density, and other physical properties of thin films and wafers used in semiconductor development. Some of the testing options include the following:

AFM surface roughness measurement

In this analysis, the surface roughness value (RMS) of the sample is determined with atomic force microscopy (AFM), typically with the Bruker Dimension Icon as the instrument. Three measurement points from the sample are included in a typical analysis. The measurement area is 5 x 5 micrometers, if not otherwise agreed. In addition to the RMS value, a 2D image, a 3D image, and raw data will be included in the test report.
220–349 €
Read more

XRR of thin films or coatings

X-Ray Reflectometry (XRR) analysis is used to measure the density (g/cm3), thickness (nm), and roughness (nm) of thin films. The method is applicable to the characterization of single- or multilayered thin films, as it provides information on the thickness and density of individual layers of the sample material as well as the roughness of the interphases. Greatest accuracy for XRR thickness measurements is generally achieved for samples containing 1-150 nm thick surface layers with under 5 nm RMS roughness. Thicker films and coatings with rougher surfaces can also be characterized, but the accuracy of thickness determination decreases as the thickness and roughness of the film or film stack increase. >150 mm wafers are typically cut to fit the sample holder. Please let us know if you need testing for larger wafers that cannot be cut into pieces. The available temperature range for XRR measurements is 25-1100 °C, and crystallinity can be studied as a function of temperature. The measurements can be performed under a normal atmosphere, inert gas, or vacuum. Measurements are typically performed using one of the following instruments: Rigaku SmartLab, Panalytical X'Pert Pro MRD, Bruker D8 Discover. Please let us know if you have a preference for a specific instrument.
183–271 €
Read more

GI-XRD of thin films

Grazing incidence X-ray diffraction (GI-XRD) measurement for thin films and surface layers. The measurement provides the following information: XRD spectrum and identification of the phase(s), Crystallinity, crystallite size, lattice parameters, and strain of the phase. NOTE that these parameters are determined if the samples are highly crystalline. It may not be possible to determine them if the crystallinity is insufficient.. Best GI-XRD results are typically achieved for samples containing up to 300 nm thick surface layers with under 10 nm RMS roughness. Thicker films and coatings with rougher surfaces can also be characterized, but the quality of the data is generally lower for rough samples, and the sample properties below 300 nm depths are typically not reflected in the results. One of the following instruments is typically used to perform the measurements: Rigaku SmartLab, Panalytical X'Pert Pro MPD, Bruker D8 Discover, Malvern Empyrean, GNR APD2000PRO. By default, the GI-XRD is conducted in ambient conditions, but temperatures of 25 to 1100 °C can be used to study crystallinity as a function of temperature. The measurements can also be performed under inert gas or vacuum if needed. Please contact our experts to discuss the available temperature and atmosphere combinations.
183–271 €
Read more

Ellipsometry measurement

Ellipsometry is an optical technique that characterizes polarized light reflected from a sample's surface. It can measure the thickness or the refractive index of a layer. Do not hesitate to contact our experts for more details.
229–359 €
Read more

Prices excluding VAT.

Semiconductor failure analysis

Mechanical and thermal testing

Our service selection includes various measurements for assessing the durability of microelectronics, PCBs, electrical appliances, and components under specified mechanical stresses and temperature conditions. These include the following standardized tests:

The above are just a few examples of our capabilities, so do not hesitate to ask about other tests.

One partner for all your semiconductor testing needs

When you order semiconductor testing services from Measurlabs, you will get access to a wide range of techniques in one place, reliable and clear results, and support from skilled experts, who will take ownership of your current and future testing projects with us. Do not hesitate to contact us to learn more.

Request a quote

Fill in the form, and we'll reply in one business day.

Have questions or need help? Email us at or call our sales team.