X-ray reflectivity
X-ray reflectivity (XRR) is a nondestructive analytical technique for determining the thickness, density and surface roughness of thin films and coatings. XRR is applicable to both single-layer and multilayer structures, as it provides information on the thickness and density of individual layers as well as the roughness of the interphases and the topmost surface.

Some of our XRR services
Prices excluding VAT.
What is XRR analysis used for?
X-ray reflectivity (XRR), also known as X-ray specular reflectivity or X-ray reflectometry, is a common thin film characterization technique. With XRR, it is possible to determine the thickness, density, and roughness of thin films.
XRR is suitable for the characterization of a wide variety of thin films, including metal oxides, metals and organic films. The investigated films may be deposited using different techniques, including Chemical Vapor Deposition (CVD), Atomic Layer Deposition (ALD), Physical Vapor Deposition (PVD), and other similar techniques. Both single-layer thin films and multilayer film stacks on any typical substrate, such as silicon (Si), gallium nitride (GaN), silicon carbide (SiC), gallium arsenide (GaAs) or indium phosphide (InP) wafers can be analyzed. X-ray reflectivity is suitable for the characterization of crystalline and amorphous thin films. The properties of the material's surface and the layers' interfaces can be determined.
An example of XRR results is shown in Table 1. The investigated sample is an Al2O3 thin film deposited on a silicon wafer with a native oxide layer. The thickness, density and surface roughness of both layers were determined.

Thickness determination with XRR is generally reliable for films ranging from a few nanometers to 150 nanometers in thickness. For films thicker than 150 nm, density and surface roughness can still be accurately measured, but thickness determination becomes less reliable. A smooth surface enhances the accuracy of XRR measurements, with samples having an RMS roughness below 5 nm generally considered well-suited for analysis.
What is the working principle of XRR?
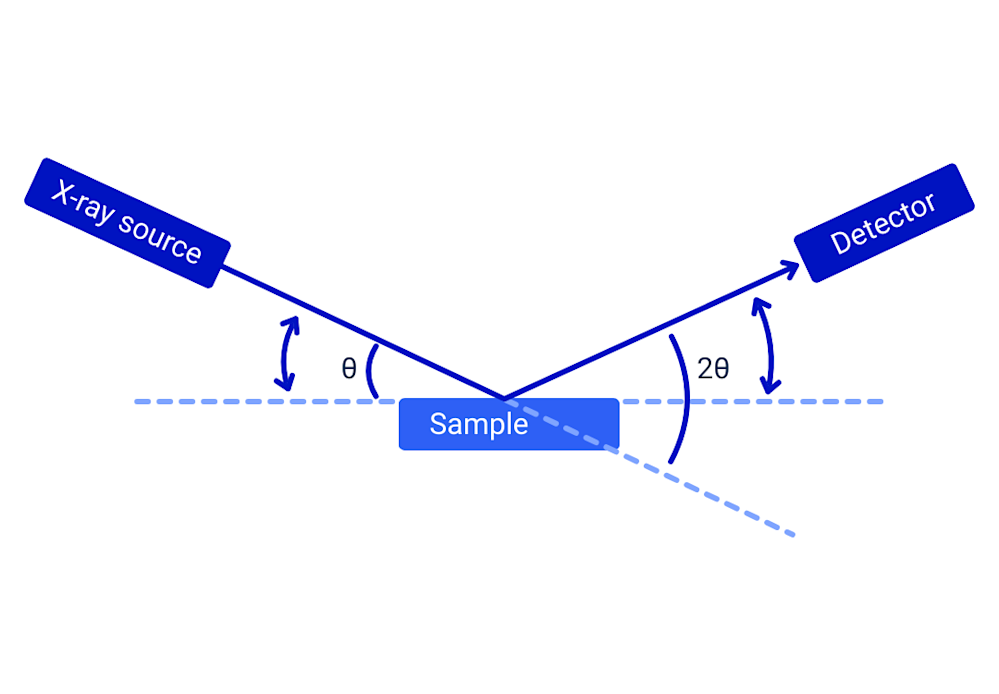
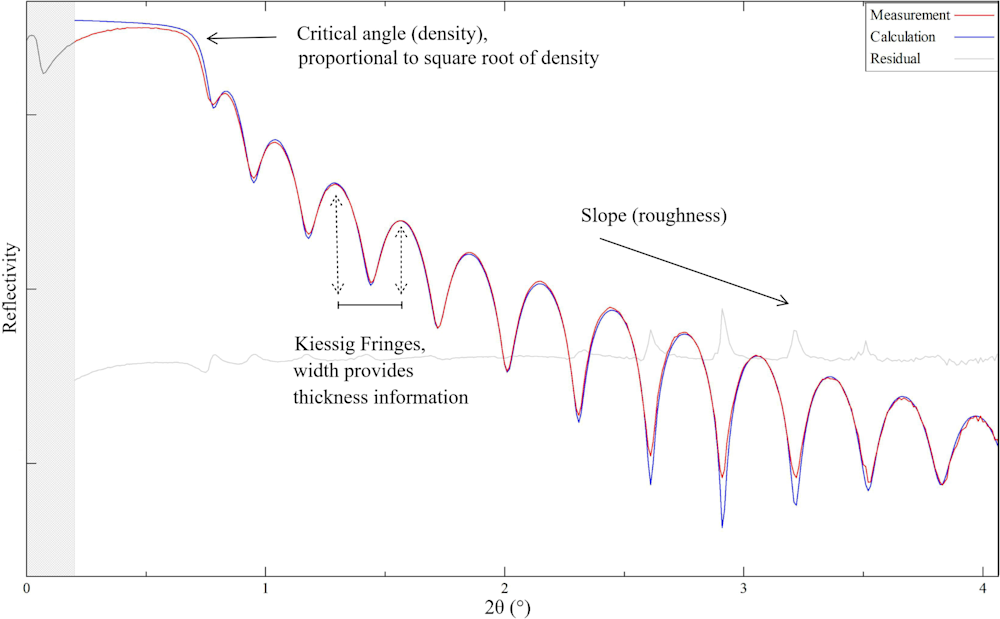
In an XRR analysis, a sample is irradiated with a beam of X-rays with a very shallow “grazing” angle. When the X-rays hit the sample, they interact with the material's electrons and reflect off the surface. The XRR instrument measures the intensity of these reflected X-rays as the incident angle is altered, creating a plot of reflectivity versus angle (Figure 1).

Each material possesses a specific critical angle determined by its electron density. Below this angle, incident X-rays primarily undergo total reflection with minimal penetration (a few nanometers). Above the critical angle, penetration depth increases substantially, while the intensity of reflected X-rays drops sharply.
For samples with thin films or coatings on a substrate, X-rays reflect not only from the top surface but also from the interfaces between different layers (wherever the material density changes). Because X-rays reflecting from deeper interfaces travel a longer path, they interfere with those reflected from surfaces above them. This interference, where the X-ray waves either reinforce or cancel each other out, creates a characteristic oscillation pattern in the measured reflectivity data (Figure 2).

By analyzing the features of the XRR reflectivity plot, the following parameters can be determined:
Density - Calculated from the position of the critical angle.
Layer thickness - Determined from the spacing of the interference oscillations (Kiessig fringes).
Surface and interface roughness - Inferred from how quickly the overall reflectivity decreases with increasing angle and how damped the oscillations are. A smoother surface leads to a sharper drop after the critical angle and more defined oscillations, while roughness causes a more gradual decrease and weaker oscillations.
Need an XRR analysis?
Measurlabs offers high-quality XRR analyses at an affordable price. We offer measurements with several instruments (see more on the XRR service page) and can handle even large sample batches efficiently. Our team of experts is always here to help you if you have any questions related to your samples or the suitability of the method for your needs.
Contact us through the form below to get a quote – and note that we offer a full spectrum of other analyses for thin film and wafer characterization as well.
Method Expert
Suitable sample matrices
- CVD thin films
- ALD thin films
- PVD thin films
- Thin films on Si, GaN, SiC, GaAs and InP substrates
- Samples having multiple films or layers of different materials
- Semiconductors
- Optical materials
Ideal uses of XRR analysis
- Determining the thickness, density and roughness of thin materials and individual films in film stacks
- Examining the properties of the surface and possible interfaces of materials
- Analyses of the structural properties of very thin single films and coatings
- Research and product development as well as quality control and optimization of production processes
Ask for an offer
Fill in the form, and we'll reply in one business day.
Have questions or need help? Email us at info@measurlabs.com or call our sales team.
Frequently asked questions
XRR is commonly used for examining the structural properties of materials consisting of one single film or a stack of multiple films, for example, ALD or MLD deposited films. The parameters, such as the thickness and density of individual layers of the material, can be determined. The roughness of both the surface and interfaces of different layers of the material can be discovered as well. The correlation properties of interfaces or lateral layer structures can also be deduced from the data.
This characterization of materials can be a huge help in their research and product development as well as in process optimization and quality control.
The elemental composition of the sample cannot be determined with XRR and so the elements that the material consists of should be found in advance. In addition to the material, its approximate thickness is also needed to know before the analysis, because only less than 5,000 nanometers thick layers can be examined.
Possible lateral inhomogeneities cannot be detected with XRR, thus a model of the sample produced with this technique does not take these properties into account.
The particle-level properties, like crystal structure and lattice parameters, of thin films, layers, and coatings cannot be analyzed with XRR. Instead, grazing incidence X-ray diffraction (GIXRD) is a suitable method for this purpose.
Materials analyzed with XRR can be for example semiconductors, magnetic or optical. XRR works best when the sample is smooth, uniform, and flat with a roughness of fewer than 2 nanometres. The overall thickness of the film examined must be less than 5,000 nanometres.
The analyzed samples can consist of a very thin single layer or multiple layers and they can have different kinds of coatings. The individual films can consist of either single crystal, polycrystalline, or amorphous matter.
Measurlabs offers a variety of laboratory analyses for product developers and quality managers. We perform some of the analyses in our own lab, but mostly we outsource them to carefully selected partner laboratories. This way we can send each sample to the lab that is best suited for the purpose, and offer high-quality analyses with more than a thousand different methods to our clients.
When you contact us through our contact form or by email, one of our specialists will take ownership of your case and answer your query. You get an offer with all the necessary details about the analysis, and can send your samples to the indicated address. We will then take care of sending your samples to the correct laboratories and write a clear report on the results for you.
Samples are usually delivered to our laboratory via courier. Contact us for further details before sending samples.
